The post How to Use Sensors In RGB Mode appeared first on International Robotics Championship.
]]>The original EV3 color sensor supports reflected light, ambient light and color mode, but this does not meet our needs. David Gilday, who made mindcuber, created the EV3 Color RGB mode in the early days, which greatly improved the EV3 Color Sensor.
Original Digital Flipped Lab (OFDL) have added other functions, including the RGB comparison mode and the raw value mode.
You can download the block from here: https://github.com/a10036gt/EV3-ColorRGBEnhanced-Block/releases/

How it works
The block has 3 different modes which will help you use sensors in enhanced way:
Measure – RGB color
This mode returns the Red, Green and Blue components of the RGB color.
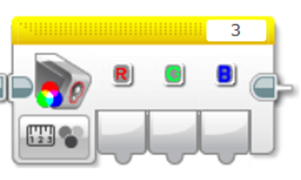
Compare – RGB color
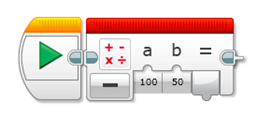
This mode is a variant of RGB mode, which allows you to change the input value to achieve the judgment effect, as shown above: 20 is Error Amount, R, G, B are 170, 160, 120, respectively.
The object reads Red to 150-190, Green at 140-180, and Blue at 100-140. When the three are established, the Boolean value is finally output.
The interval is determined by Error Amount, which is what you input. The RGB value +-Error is the judgment condition.

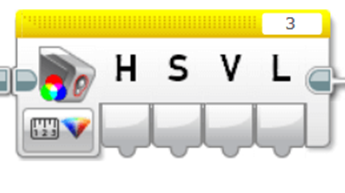
HSVL Mode
This mode allow you reading the HSVL value of EV3 Color sensor (convert from RGB).
Citation:
ODFL Original Digital Flipped Lab
https://ofdl.tw/en/ev3-hacking/ev3-color-sensor-adv-block/Ver 1.6:
.Add HSVL Mode.
.Remove Raw value mode (merge to EV3-AdvEV3Col-Block)
Download
Download Link (GitHub):
Author:OFDL HSU、T2H Robotics
Ver:1.6
The post How to Use Sensors In RGB Mode appeared first on International Robotics Championship.
]]>The post How to Solve Complex Tasks appeared first on International Robotics Championship.
]]>What is the Goal Breakdown Structure?
If you search on the internet, you will find various definitions, some complicated, some simple to understand. In case of robotics missions as you are given in our competition, you can translate it into breaking the big task into multiple, simpler tasks, which are or are not related between each other.
This kind of practical thinking is something that us, humans, do all the time. For example, when we go to school, we need to do some simple tasks in the process:
- get dressed:
- check weather first;
- get proper clothing;
- fill our schoolbag with whatever we need and equip it;
- make sure we close our house door;
- take the bus:
- find a seat on the bus;
- check we have everything we need to proceed;
- get to class:
- make sure you know to which class you are heading;
- put your stuff in the locker;
- keep only the necessary stuff for the class.
As you can see, there are little goals you need to achieve and have certain subgoals which will finish the main goal. But every each one of them is simple, easy to understand and has little instructions in the process.
Now that you understood this, let’s go back to robotics  . We will use the mission from stage 3 as an example.
How to breakdown a robotics mission
Understand needed principles
First of all, you need to look at the whole mission and identify what principles apply for it. Let’s have a look at it.
You can see certain elements which are obvious: we have black lines on white background, white lines on black background and maybe some orange lines on black background. Then, there are some blocks which needs to be pushed and some rotating devices on the other side of the table.
So, the principles involved are:
- classic line follower (following black line);
- inverted line follower (following white line);
- color line follower (following orange line);
- push regulated objects (you can push the orange blocks and also the rotating devices).
These are also the simple tasks the robot has to perform.
As you can see, these are basic functions, which need some skills of programming and designing the robot, but it is not something new or unique. I am sure you have done this a couple of times before .
Ok, you understood this part. What now? Well, we need to design the robot which can carry out these simple tasks.
Designing the robot
Robot design is very important as many of the simple tasks will be solved by the construction itself. Think how you will push the object so that the robot should just move forward, without the need of having additional claw or mechanisms. The simpler the design, the more effective!
Then, you need to think what programming algorithms you know and how that influences the design. For example, you know how to implement the classic line follower with only one sensor? Good for you! Now where do you put that one sensor so that the robot can move quick and correct?
You need to ask yourself all these questions before starting the design. Maybe you will not get it right at first, because after testing you will see you will need some more stuff. That’s alright, it will surely happen. But, if you are giving it some thoughts before the first iteration, maybe you will not need to make so many of them afterwards.
After you feel the design is ready, you need to create some basic functions so that you will simplify how you will right the code. In most cases, the functions are custom blocks.
Creating basic custom blocks / functions for the robot
This will certainly help you simplify your code. Let’s say you need to create a line follower block. You should create one which will have some parameters, like speed or turn correction. Why? Because in some cases you will want to move faster, in others you will want to move more precise.
For the given example, you can see that if you implement a classic line follower algorithm, which stops whenever intersects a black line, the robot will travel from the start all the way up to the table. Simple, right?
So, the main program will just have one block for line follower instead of 10 blocks for just one path to be followed. It will be much more quicker to go through the code when you will want to make adjustments and will save you lots of time.
Also, if there is a problem in the line follower algorithm, you will need to correct it in just one place instead of many others.
Conclusion
This is just a basic method to solve complex missions for every competition, not just this one. Of course, you should not exaggerate and think of every action as a goal, but little by little you should start to gain progress.
Remember this little thing: whatever you need to solve was created by a human, so there is a solution to it. And most probably, he created the mission in the same way you want to solve it: step by step .
The post How to Solve Complex Tasks appeared first on International Robotics Championship.
]]>The post Line follower concepts appeared first on International Robotics Championship.
]]>- The simple line follower program is the most basic of the four types, it also wiggles a lot because of the sharp turns, so it is not smooth.
- Make sure to calibrate your censors, since the programs use the EV3 Colour Sensor in Light Sensor.
- And so, the second type would be the smooth line follower, where it is almost exactly like the simple, however the turns are not as sharp, this will result in issues on sharp curves.
- The third type is the 3-stage follower, this is best used for straight lines, and nested switches are needed
- The final type is the proportional follower, which makes proportional turns. This type works well on straight and curved lines.
- The pseudocode of this follower is: first, reset the rotation sensor, compute the errors and determine the distance from the line, establish the correction amount and adjust the scaling factor, then use the correction value to adjust the robot’s line following.
The post Line follower concepts appeared first on International Robotics Championship.
]]>The post Programming #101: The Line Follower Principle appeared first on International Robotics Championship.
]]>Switch Line Follower
The Switch Line Folllower requires the use of loops and switches and wiggles a lot due to sharp turns.

The switch block is used to represent the if/else logic of the algorithm. This is where the decision to do one action or the other action is done. In the case of the line follower, this is where the robot will know if it will turn left or right.
The loop block is used to tell the robot how many times the action will be performed. For the line follower, the switch block is inside the loop block and the robot will perform the color reading according to the number of times indicated in the loop block.

The pseudocode for this kind of follower is as follows:
- Take a new light sensor reading.
- Compare the reading to the set threshold value. To set the robot just at the edge of the line, the threshold value should be set to 50.
- If the condition is true, turn the motor to the right.
- If the condition is false, turn the motor to the left.
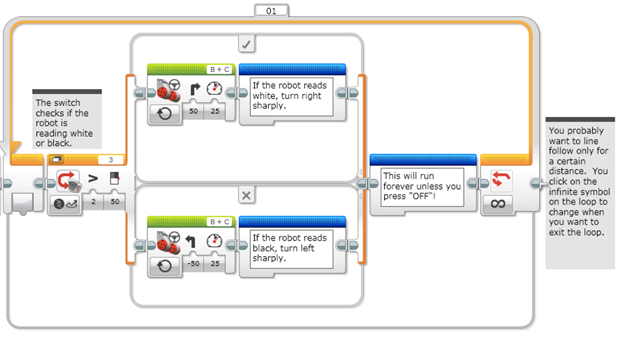
This is a sample program for a switch line follower. The sensor will check if it senses black or white. If it reads white (> 50), the robot will turn right sharply. If it reads black (< 50), the robot will turn left sharply. This action is placed inside a loop and the programmer can dictate how long the robot should perform this action.
Proportional Line Follower
The other line follower to be discussed is the Proportional Line Follower. It is more sophisticated than the switch line follower because it uses Math Blocks and Data Wires. With the use of these blocks, the robot can take readings and do corrections based on the readings.
The Math block is used to perform mathematical operations such as addition, subtraction, multiplication and division.
The data wire is used to take an output data from one block and used it as input data in another block.

The pseudocode for the Proportional Line Follower can look like this:
- Reset the Rotation sensor (Only required for line following for a total distance)
- Take a new light sensor reading.
- Compute the error. Distance from line = Light sensor reading – Target reading
- Scale the error to determine a correction amount. Adjust the scaling factor to make the robot follow the line smoothly.
- Use the correction value (from Step 4) to adjust the robot’s turn towards the line.
This is a sample program:

- Step 1 is to reset the rotation sensor.
- Step 2 is when the color sensor will take a light reading and input it into the Math block as variable a.
- Step 3 is when the Math block will compute the error which is a – b. Then the output will be inputted to the next Math block which is Step 4.
- In Step 4, the Math block will multiply the error by a scaling factor or a Constant of Proportionality. This scaling factor is based on the robot design and can be usually determined thru trial and error. The correction will then be inputted to the move steering block to adjust the robot’s turn towards the line.
- Steps 2 – 5 are inside the Loop block and can be performed according to what the programmer needs.
These two Line Followers are the most commonly used. Aside from these two, what other kind of line follower do you know or have you created by yourself?
Sources:
https://ev3lessons.com/en/ProgrammingLessons/advanced/LineFollower.pdf
https://ev3lessons.com/en/ProgrammingLessons/advanced/ProportionalLineFollower.pdf
The post Programming #101: The Line Follower Principle appeared first on International Robotics Championship.
]]>